How to Install Low Voltage Outdoor Landscape Lighting
Updated 10/12/23 by 1000Bulbs Staff
The do-it-yourself installation of low voltage landscape lighting is a breeze when you have the right light fixtures and a plan already in place. Part 1 of our guide explains which materials you need to install lights, as well as available low voltage lighting options.
It also includes a few tips on choosing the best location for your fixtures. This post gives step-by-step instructions on how to install landscape lighting.
Reviewing the Materials Needed when Installing Low Voltage Lighting Outdoors
As a recap, you'll need these materials to install landscape lighting:
12-Volt low voltage lighting fixtures of your choice
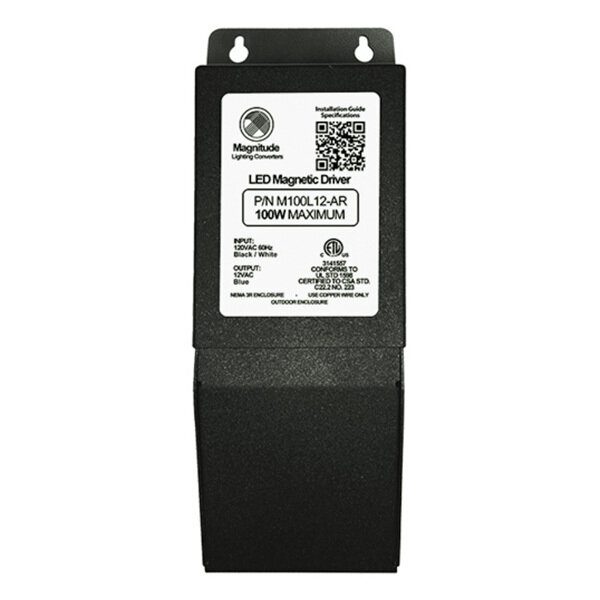
12-Volt, outdoor-rated transformer (rated for at least the total wattage of your lighting fixtures)
100 feet or more of 10- or 12-gauge landscape wire (listed for direct burial)
A square-blade shovel
Additional Helpful Items for Installing Landscape Lighting
These optional materials are dependent on your specific low voltage landscape lighting system, the layout, and your preferences:
A timer or photocell (if it’s not already built into the transformer)
Weatherproof wire nuts (with sealant in them)
Weatherproof cover for your GFCI outlet (if your transformer is a plug-in model)
Aluminum tent stakes
Wire clips and stainless steel screws (for mounting cables to trees)
Weather-treated wood post for your transformer
Voltmeter
PVC pipes, couplers, and caps (to weatherproof connections to path lights)
Step 1 – Lay out your light fixtures and landscape wire
The first step in DIY low voltage landscape lighting is to choose a location to install your transformer near your home. Then, as you plan the layout of your light fixtures, it's important to take steps to avoid voltage drop.
Your transformer should be centered in your layout in case you have to wire more than one line, i.e. “run”, to the transformer.
Your first light fixture should be installed about 10 feet from the transformer to prevent it from getting too much voltage and burning out prematurely. Here are five basic layouts used for landscape lighting:
Series – Also known as a “daisy chain”, series is the most common layout but also the most likely to incur voltage issues. The wiring is an easy, single run with lights located along the length of the landscape wire.
Split – Multiple series single runs wired back to one transformer is known as a split run.
Tee – If you need to run landscape wire for a lengthy distance like under a sidewalk or driveway, a tee run places the transformer at the end of the center of the “T” while the legs spread out on either side. Make sure to use heavier gauge wire, such as a 10 or 12-gauge, or a double run of landscape wire to form the center leg of the “T”.
Split Tee – Basically multiple tee runs, all to one transformer.
Loop – This is a series run but instead of ending the landscape wire at the last low voltage lighting fixture, the wiring comes full circle, making a big “loop” back to the transformer. This layout can be tricky since you need to be extremely careful not to cross the wires. Load side transformer wires tend to be the same color and only connections from the transformer to the main power source are different insulation colors to denote the hot from the neutral wire.
To reduce voltage drop issues, recommended layouts include multiple straight runs in several directions, a tee connection run, or a looped cable run.
When you measure out your landscape wire, allow about an extra three feet of wire so you don't come up short as you begin to bury or splice your wiring. String the wire under or around obstacles like fences or shrubs. Ideally, run the landscape wire about one foot from the edge of a sidewalk or pathway.
Step 2 – Mount the transformer
Position your transformer close to where you will connect it to the main power. If you need to position a photocell on the transformer, then it may need to face a particular direction.
You can mount the transformer to the exterior wall of your home or use a 3-foot, weather-treated wood post or a 2x3" stake.
The transformer should be at least one foot above ground level. If the transformer is a plug-in model, make sure your receptacle is an outdoor GFCI outlet rated to protect against electrical shorts and covered with a weatherproof cover.
To hardwire a low voltage transformer, the main power should be turned off at the breaker panel before making any electrical connections.
Transformers have at least four wires. On one side, often called “input”, there is usually a white wire and a black wire to connect to the main power or line voltage coming from your home.
Always remember to connect matching colors. The white wire from the transformer should connect to the white wire from the house (white is usually the neutral wire) and the transformer's black wire should connect to your home's black wire (typically the hot wire).
Sometimes there will also be a green wire that acts as the ground wire. The other side of a transformer is the “output” side and has two similarly colored wires, like two red or two blue wires.
These wires supply power to your low voltage circuit. The polarity of these wires is not essential; either wire on the output side of the transformer may be connected to either wire of the low voltage circuit. All of the main wire connections should end up inside the transformer's outdoor-rated casing.
Step 3 – Dig trenches for wiring
Grab your flat nose or square-bladed shovel and make small trenches for your unburied wire.
To make a small trench, simply place your shovel perpendicular to the ground and wiggle it to create a “V." You don't need to pull the grass up completely.
The trenches should be 3 to 6 inches deep depending on the location and how intensive your gardening and lawn care may be. Dig six inches deep if the soil gets turned over fairly often.
Leave a small bit of slack when you get to each fixture since you'll need to cut or connect your fixtures later. Push your landscape wire into the trench and leave the trench open for adjustments.
Lighting Installation Tip: As tempting as it may be, don't use your shovel to push wires down into the trenches. You could accidentally cut the landscape wire completely or slice the wire's insulation and expose it to elements that could cause an electrical short. Instead, use a piece of thin plywood or your fingers to push the landscape wire down.
Step 4 – Installing and positioning landscape lights
Many low voltage landscape lighting fixtures are prewired and include snap-on or press-on wire connectors to connect the wiring.
These connectors use sharp needlelike prongs to puncture the wiring and make contact with the wires without cutting them completely apart. This is a convenient and easy-to-install setup.
However, snap-on wire connectors have been known to rust or fail, requiring you to dig up the wiring and make new connections.
For more durable wire connections, we recommend screw-on, weatherproof wire nuts with sealant in them to keep out any moisture that seeps into the ground.
The stakes for path lights are known to sink over time, with the rising and sinking ground over the seasons. One method to keep your top-heavy path lights standing tall is to give them more burying depth by using 1 ½-inch PVC pipes, caps, and couplers.
Simply wire the run from the main power source through a tee coupler attached to a PVC pipe buried vertically.
Remove the stake from the light fixture and add the cap to the base of the path light, threading the fixture's wiring through the cap.
Also, cut off the snap-on connectors and use wire strippers to strip a ½-inch length of insulation off the fixture's wire.
Connect the light fixture's wiring to the run with weatherproof wire nuts and place the all of wiring inside the PVC pipe. Cover the pipe with the cap and fixture.
Landscape Lighting Tip: Pond and fountain underwater lights are watertight and often have weighted bases to keep them at the bottom of your pond or in a certain position.
They also have long cords that allow you to bury the wire connections in drier dirt along the pond's edge. Try to keep these connections and other non-aquatic landscape lights at least 10 feet away from your water features.
Step 5 – Bury your landscape wiring
Burying your landscape wire and tamping the soil back down should be the last thing you do, allowing you to troubleshoot or adjust your landscape lighting more easily.
Have a voltmeter on hand to help anticipate voltage drop, especially in systems with more than ten lights or for low voltage lighting systems with wire runs longer than 100 feet.
Landscape Lighting Tip: The most common problems when trying to install low-voltage landscape lights are poor wire connections, too many light fixtures on one transformer (i.e. overloading), and cables that are too small for the load. Double-check everything!
Need to Purchase Light Fixtures for Your Low Voltage Landscape Lighting?
Proud of your backyard? Then post a picture of your outdoor escape to our Facebook or Twitter pages. If you're looking to install a low voltage landscape lighting system, visit 1000bulbs.com.
You can also call 1-800-624-4488 and speak with one of our knowledgeable staff members for more advice on landscape lighting installation.


